Backups revisited – Mozy

In a previous post, I discussed the virtues of having an automated backup process. I gave the advice of having an external drive or file server as well as some offsite backups. I’ve since changed my mind.

I had some troubles configuring my file server to properly go to sleep and wake up when needed, so the file server ended up staying on all the time. Armed with my trusty kill-a-watt, I determined that it was costing me almost $5 a month in power to keep that PC up and running. Also, it started acting flakey, not a good attribute for a dedicated backup server! Finally, like many people, every time I get some extra storage space, I tend to fill it with stuff rather than leave it for backups.

I did some more testing and planning, and eventually decided to go with Mozy for online offsite backups. For $5 a month, you can back up as much data as you want, secure, encrypted and offsite. Mozy runs in your system tray and unobstrusively encrypts and uploads your files to their servers when your computer is idle. Before, I wasn’t backing up all of my file – I deemed my 100GB of home video projects too large to keep redundant copies of, but since Mozy offers unlimited storage, there’s no reason not to back that up.

Since your $5 buys you the ability to back up one PC, I’ve installed it on my desktop PC downstairs and set up processes to copy important files from our laptops onto that PC for backup. With Mozy you can back up any folders you want. I’ve tried recovering files too, and everything worked fine. Afterall, an untested backup is an untrusted backup.

Oh yeah, I should probably mention there’s a free option as well, if you don’t have much data to store. If you click on the Mozy link above, you’ll get an increase in your storage space through the referral program.

For the record, I did try Carbonite as well, but I didn’t like the lack of options nor did I like the fact that they don’t back up some file types. Also, it just plain didn’t upload for me, but maybe I had a firewall issue or something.

One thing you need to be aware of: offsite backups over a cable modem are SLOW! My initial backups (125GB) literally took MONTHS to complete. It’s not Mozy’s fault though. If you do the math, I was maxing out my upload bandwidth nearly the entire time. After the initial upload, Mozy only uploads the changes, so keeping current isn’t bad. About the only way to get around this speed limitation is by using Sneakernet.

All-in-all, I’m happy with my new scheme. $5 a month is a small price to pay for constant offsite backups, and now that I don’t do the local backups anymore, I have more disk space to play with! With two kids to play with, there are much better things to spend my time on than managing my backup server or performing manual backups. While that initial backup period required me to be a bit patient, Mozy has taken one item off my list of things to worry about.

Gas mileage improvements

Spurred on by a related post from wyoming_1, I’ve decided to finally post the results of an experiment I tried recently to improve the gas mileage of my truck on my daily commute.

I drive a 2007 Toyota Tundra 4-door pickup with a 5.7L V8, so as you can imagine, my mileage isn’t great. My average overall mileage before my experimentb was 13.13 MPG. As the result of some driving style changes, I’ve achieved 16.7 MPG, which is almost a 30% increase! That’s an easy $20 a month on my commute alone.

First, a little background. My daily commute is 6.9 miles one way, with 10 stoplights and speed limits of 30 through 55 MPH. It takes about 15-16 minutes on average. That’s all the truck gets used for, not counting trips to Menard’s and camping trips, etc. I would classify my driving style as average compared to the other vehicles on the road – not terribly aggressive. For the record, we also own a Mazda5, one of the most fuel-efficient 6 passenger vehicles available on the North American market, but this post isn’t about my choice of a vehicle. It’s about doing the best I can with what I’ve got, and hopefully what I’ve learned will work for you too.

To get accurate results, I measured my mileage by dividing the number of miles driven on a tank by the number of gallons required to fill it. My driving patterns didn’t change (mostly just driving to work) and the weather was consistent before and during the test, meaning I used the air conditioner about the same amount. I filled up each time using the same technique on the same gas pump at the same time of day. In short, all I did was use the accelerator and brake pedals as little as possible. I did set some rules for my experiment, however, to make the adjusted driving style usable. After all, I’ll bet if I drove 25 mph everywhere I went I could get great mileage, but I wanted a practical technique.

  • Limit engine speed to 1500 RPMs (that’s my engine speed in overdrive at 60mph – this figure won’t be appropriate for smaller engines)
  • Always obey the speed limit
  • Drive at the speed limit on extended stretches
  • Don’t upset other drivers (except those who are being jerks anyway)

While following those rules, I was able to employ the following techniques and tips:

  • Use the brakes as little as possible.
  • Coast as much as possible, especially to red lights.
  • Don’t brake at turns any more than you have to to remain safe. Preserve your momentum!
  • Accelerate at a rate of 1.5 MPH per second. That means it’ll take you 20 seconds to accelerate to 30 MPH. This is very leisurely, about like a loaded semi.
  • Use cruise control.
  • Learn the timing of your usual traffic lights. There’s no point in speeding up to a light that you know is going to stay red for a while. Try to roll through on green no matter how slow you’re going.
  • Choose a time of day where traffic is conducive to this driving style. For me, 7:15am is great and 7:00am is awful.
  • Choose multi-lane roads when possible so impatient drivers have a chance to go around you.

Here are some other observations from my experiment:

  • Most drivers are content to fall in line behind me instead of racing around me.
  • Even in gear, I can coast a long distance with only a minimal loss of speed.
  • If I start at 30 MPH, I can coast the last four blocks to my house, around two corners and into my driveway, losing only 10 MPH.
  • Lots of drivers think it’s a race like to win the race to a red light, but we usually all meet up on the same red lights anyway.
  • When you drive a vehicle that can do 0-60 in under 6 seconds, it’s hard to do it in 40 seconds at first. After a while you get used to it, though, and it’s actually relaxing.
  • I’ve only had one driver get mad. I was in the rightmost lane out of three at a red light. He was behind me and expressed his dissatisfaction with my acceleration in a variety of ways. He was about 60 and drove a silver VW Turbo Passat. I haven’t forgotten his license plate number yet.
  • My new driving style has added less than a minute to my commute.

There are some other techniques I’d like to explore to improve this figure further, but so far my results have remained consistent. I’ve got a ScanGauge II on order. Once I get it I’ll be doing some more experiments, such as the controversial use of neutral and different tailgate/tonneau configurations.

I’d encourage you to give some of these tips a try. If your results match mine, your savings will be the equivalent of today’s $4 gas dropping to less than $3!

Drying rack for cloth diapers

I’m in the middle of a rather large project, so I decided that I’d go for a “quick win” (as they say at work) to get something posted here. I wrote up a quick page about the DIY drying rack I threw together. It literally took longer to write the page than to build the project.

diaper drying rack in laundry room

View the Cloth Diaper Drying Rack project page for more information.

Free graph paper

I’ve got a new building project, and I needed some graph paper to do my design work. You can always go buy a pad of special graph paper, but I found that you can download PDFs of graph paper and print them at home.

There are a lot of choices, but one I like is from Incompetech.com. I use the multi-weight PDF generator to create exactly the grid I need.

Also, there are many choices for free music staff paper as well.

Archiving old email – part three

When searching is what you need to do, Google is hard to beat. For this reason, I wanted to mirror my local email archive onto a Gmail account. As I mentioned earlier, I’ve already archived all of my mail locally in Thunderbird. I set up a second Gmail account for my archive, in order to keep my old archive mail separate from the current mail. Since I have mail from several accounts funneling into Thunderbird (including from my main Gmail account), uploading all of this mail back into my main account would be confusing and result in duplicate messages being sent to Gmail. Likewise, I don’t want all of the old email addresses found in my old mail cluttering up the address book of my main Gmail account.

Despite the fact that Google now supports IMAP, it hasn’t gone as smoothly as I’d like. For those of you who don’t know, IMAP is a protocol that lets you upload, download and synchronize mail from your client application (on your PC) to a mail account stored on a server. In theory, I should be able to just set Thunderbird to use my Gmail account using IMAP and upload the mail that way, but in practice, Gmail isn’t very cooperative.

Here’s what I’ve tried:

  1. Drag and drop my whole mail folder structure from the local folders to Gmail over IMAP in Thunderbird
  2. Upload the mail folders using Outlook instead of Thunderbird
  3. Upload each mbox file to Gmail using IMAPSize
  4. Move the messages from another IMAP server to Gmail using imapsync

Basically, each attempt encountered problems during the upload. For some reason or another, the transfer would abort, but the problem was always on the server side. I did some reading, and I discovered that Gmail doesn’t officially support uploading via IMAP. Apparently I’m not the only one having problems with this upload.

Now, for what it’s worth, uploading from Thunderbird to Gmail was working, albeit sporadically. If I uploaded small enough chunks infrequently enough to keep Gmail’s servers happy, the upload mostly worked. The good news is that Gmail handles duplicates pretty well. Say you have a folder of 1000 messages, you try to upload it, and it croaks after 400 messages. If you try to upload that folder again, it will NOT duplicate those 400 messages. If you’re patient, just upload one folder at a time using this method.

I wasn’t patient enough for that, so I used another technique, which may or may not work for you. Through my web host, I get to set up IMAP accounts tied to my domain. What I did was pretty simple:

  1. Set up a new account IMAP on atterberry.net
  2. Upload all my mail to THAT account via IMAP (which wasn’t as picky, since it’s not Gmail)
  3. Set up my Gmail account to download all the mail from that atterberry.net via POP
  4. Wait!

All that processing just finished a couple of hours ago. Now I have a great searchable archive! I also like the way Gmail assembles the individual emails into conversations.

Now, to keep my archive up-to-date, I need to copy any new mail that I receive in Thunderbird to this archive Gmail account. Since this is usually pretty small, I’ve had pretty good luck uploading to Gmail directly over IMAP.

Archiving old email – part two

In the previous post, I described my method for archiving my old email in Thunderbird. As promised, here are some notes about cleaning up your inbox in Thunderbird.

Removing duplicates

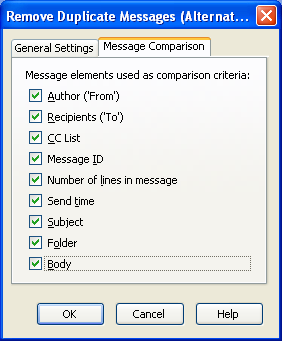
One great tool I like to use is the “Remove Duplicate Messages (Alternate)” Thunderbird extension. To use the extension, you must first set the options, then you run it on a folder.

To change the options for the duplicates extension, go to Tools > Addons, find the extension, and hit the “Options” button. You’ll see the dialog shown below:

Remove Duplicate Messages dialog

Setting these checkboxes changes the criteria for comparing two messages. The more boxes you check, the more sure you can be that any duplicates you find will actually be duplicates. I like to start by setting all the checkboxes. This takes some time, but it’s very safe.

To run the extension, right click on a folder and select “Remove Duplicates.” It will crank away for a while then show you a dialog on which you can review and delete the duplicates found. I right click on my “Mail Archive” folder, since that will compare all messages in the subfolders within the archive.

After that pass, depending on how you’ve handled you email in the past, you may need to run the duplicate remover with different options. If you do this, you’ll likely eliminate quite a few more duplicates, but you should always preview the emails in this step before deleting anything. Try turning off the following criteria, one at a time: number of lines, body, message ID and folder. I found some duplicates with minor differences in those areas due to the different ways the messages had been handled in the past. Turning off the folder criteria will find duplicates in different folders (which is nice), but be careful to keep the copy that you’ve filed properly.

Whitelisting

Another technique I found VERY effective in clearing out my email backlog was to set up a “whitelist” in Thunderbird. Basically, I add every valid email address for a real person I’ve communicated with into an address book and set up filters to move messages around based on whether the sender is in that list.

Now, you probably wouldn’t want to add all of these email addresses to your regular address book, but Thunderbird allows you to have multiple address books. I created a new one called “Whitelist” and didn’t put a lot of effort into keeping that one neat or fully filled out. The whitelist address book will contain any email address, current or old. You probably only want active email addresses in your normal address book.

To build my whitelist, I went through my folder of unsorted mail (sorted by sender), and previewed messages from anyone I knew. For each new person, I right-clicked on the email address and chose “Add to Addressbook”. I didn’t bother filling in the person’s name, since it doesn’t really matter for this technique.

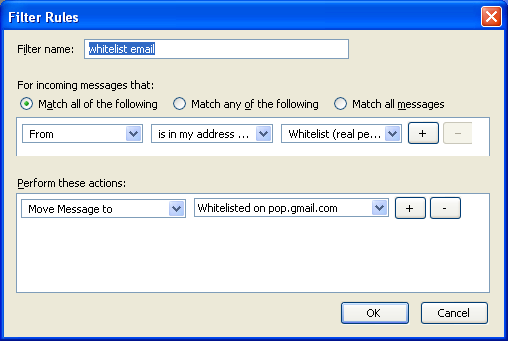
The next step is to set up a filter. Create a filter that you can run on your unsorted mail folder like the one shown below.

Whitelist filter dialog

My filter moves all whitelist email to a folder called “Whitelisted”. It runs both when new mail arrives and when I manually run it on the unsorted inbox folder. With this setup, I can refine my whitelist. If I add some more addresses to the whitelist, I can rerun the filter until I’m left with only junk in my inbox.

After all this processing, I’ve separated my good email (from real people) from the mass mail, etc. At that point, I can move the good email to the archive and take care of the other mail however I see fit.

Archiving old email – part one

Some may wonder why, but I’ve been on a long quest to properly archive my old email. I have around 25,000 email messages saved since 1995, and I’d like them to be organized, searchable and future-proof. Of course, some emails I like to keep for purely sentimental reasons, but I also have found my archive useful when working with home videos and photos albums. Have a video of a camping trip but don’t remember when it was? Find the planning emails!

Over the years I’ve had a lot of accounts on a lot of systems. First, in college, I had your typical Unix mail. Later, I used a POP mail account with Eudora. Most recently, I ended up using Outlook to download the mail from my webmail accounts. I wasn’t entirely happy with this setup, since only Outlook can read the PST files that the mail is stored in, and if a PST file gets too big it can self-destruct.

Local mail archive

The first thing I wanted to do was to store my mail in a standard format (i.e. future-proof) on my PC. I chose Thunderbird as my desktop client, since it runs on any operating system, is fairly stable, and uses the standard “mbox” mail file format. Likewise, importing mail from Outlook is easy (there’s an import wizard), and importing from Unix mail and Eudora files is as easy as copying the mailbox files into the mail folder (since both use the mbox format).

Importing your backlog

Here are the steps I took to archive my backlog of old mail in Thunderbird:

  1. Install Thunderbird.
  2. Import all your old email into Thunderbird. If you’re using Eudora, Outlook or Outlook Express, you can just use Thunderbird’s import feature.
  3. Make sure you don’t have any duplicates. Use the Remove Duplicate Messages Thunderbird extension. See part two for some hints.
  4. Clean up the spam, junk notifications, etc. from your imported mail. See part two for more information.
  5. Move all of the old mail under a “Mail Archive” folder. Create subfolders to organize if you want, but keep it all under the archive folder.

Archiving new mail

To continue archiving the new mail you receive, set up Thunderbird to download your incoming mail. Here’s what I did:

  1. Set up Thunderbird to download mail from your POP3 accounts. Here’s how to set up Thunderbird with Gmail, for instance.
  2. Make sure you don’t directly put this mail into the “Mail Archive” folder listed above.
  3. Set up filters to delete or move any email you’re not going to keep.

Every once in a while, you can process new mail into the archive:

  1. Hit the “Get Mail” button in Thunderbird to download new messages into the inbox.
  2. Clean up the inbox using all the techniques you used for cleaning up your initial backlog above.
  3. Move the good mail to the “Mail Archive” folder once it’s clean.

Those are my basic processes. In a post coming soon I’ll discuss some techniques for cleaning up your mail folders to get rid of spam, notification emails, etc.

My tall girl

Yesterday Mia had her two-week checkup at the doctor’s office. Her 2-week measurements were 10lbs and 21.5 inches. As you may recall, she was 19 inches long at birth.

If she keeps growing at this rate, she’ll be nearly 6 feet tall by her first birthday. I guess there’s a CHANCE the original hospital measurement wasn’t accurate 🙂 These measurements basically put her at 90-95th percentile on both height and weight.

Evan is still pretty fond of her. He’ll sometimes call her “Mia Mia”. Of course, maybe he just speaks Italian…

Introducing Mia Charlotte

Mia Charlotte Atterberry was born on 3/15/08 at 9:40am, weighing 8lb 15.5oz and 19in long. Mom and baby both doing great!

Click on the picture below for some pictures we’ve posted:


Mia

We’re all home from the hospital, and I’m taking the week off. Evan is excited to be a big brother! Thanks so much to all of our family and friends who have visited, sent gifts, called and sent well-wishes. We’re lucky to have so many who care about us!