
Published: 8/26/2011
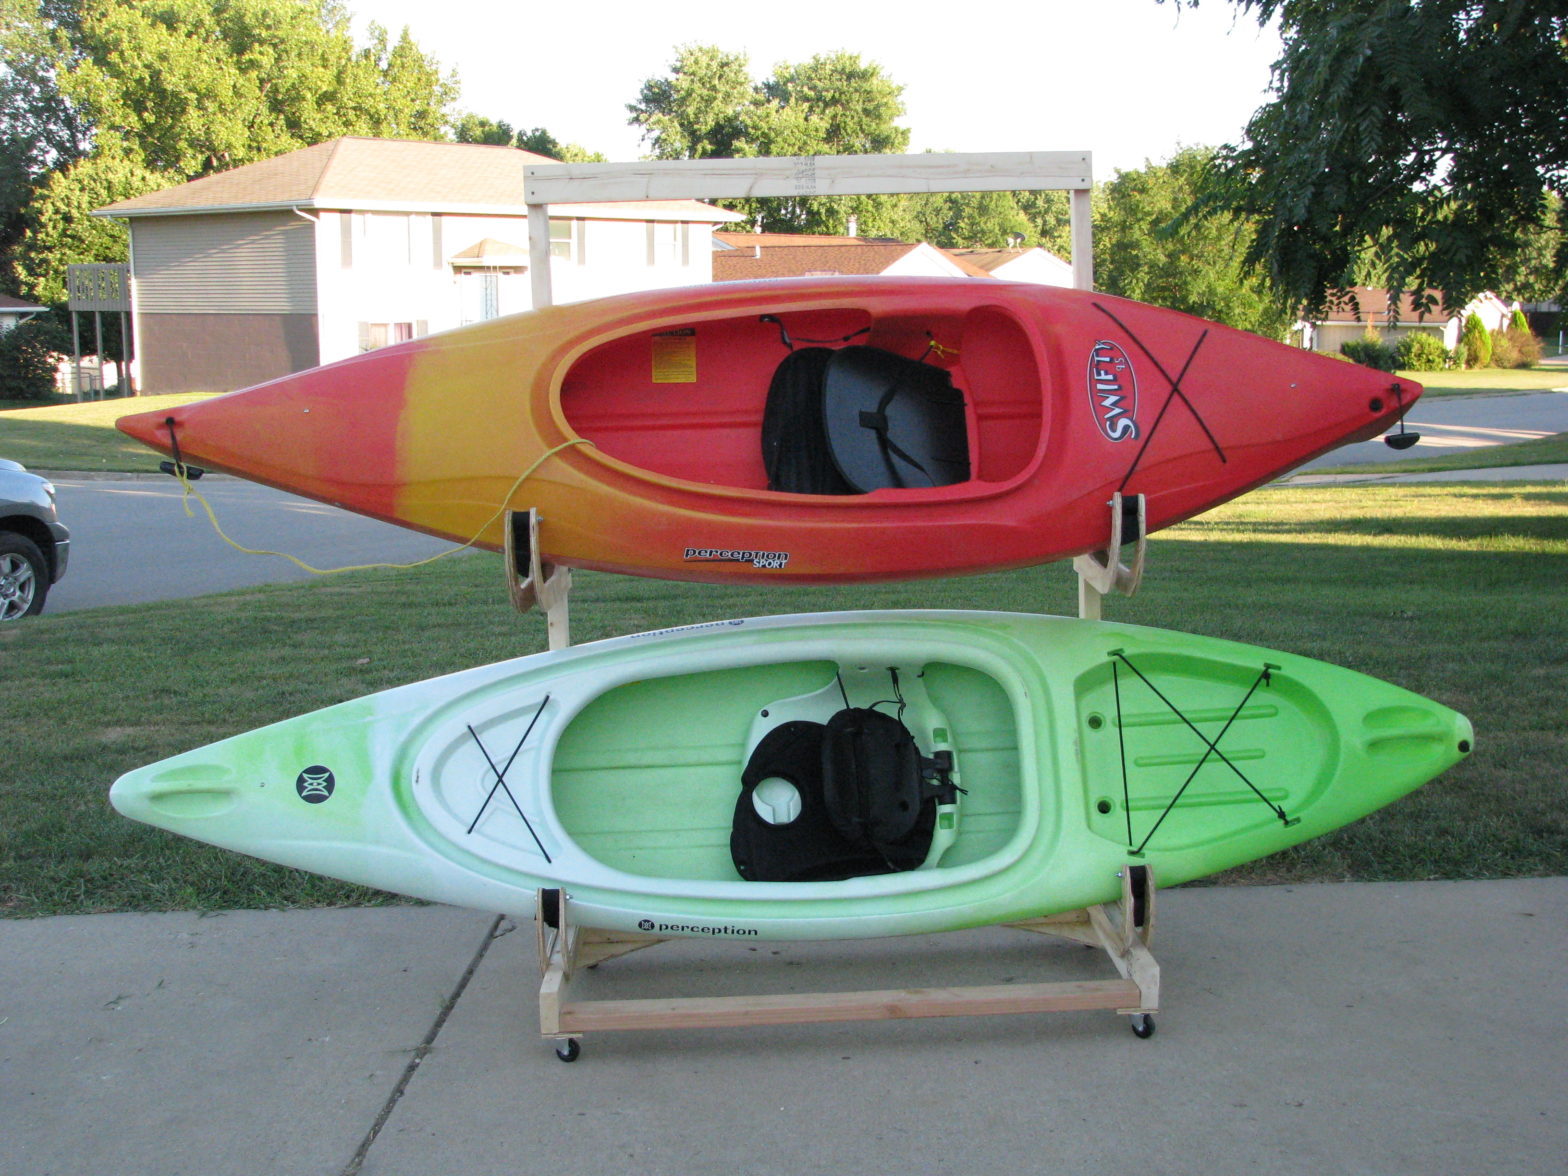
We recently bought a couple of kayaks, so I had to come up with a way to store them. After doing a little research, I determined that storing them on their side, without any hard pressure points, was best. If not stored properly, kayaks can deform.
That said, I’ve since also built another rack that stores boats as if they’re on a car-top stacker, because I’m running out of room!
Some of the storage options I’ve seen use a nylon strap to gently cradle the kayak, since the strap can conform to the contour of the hull. Also, some sources suggest that it’s best to support the middle 40-50% of kayak.

I built this rack for our kayaks for about $50. Since ours are 10 footers, I placed my supports a little over 4 feet apart. The only significant challenge was designing the support brackets that actually hold the kayaks, so that’s what I’ll focus on.
What you’ll need:
- A sheet of ½†plywood
- About five 8ft 2x4s
- 5/16†hex bolts (3 inches long)
- 5/16†washers and nuts
- 1-1/2†wood screws
- Casters (optional)
- 1†dowel
- 1†schedule 40 PVC
- Nylon straps (I found 9ft long 1-1/2in wide straps in the camping section of Walmart).
To make these brackets, here’s what to do.
- Take a sheet of plywood and cut it into 16†x 24†panels. You’ll need 4 panels per boat. With this size, you shouldn’t have any waste.
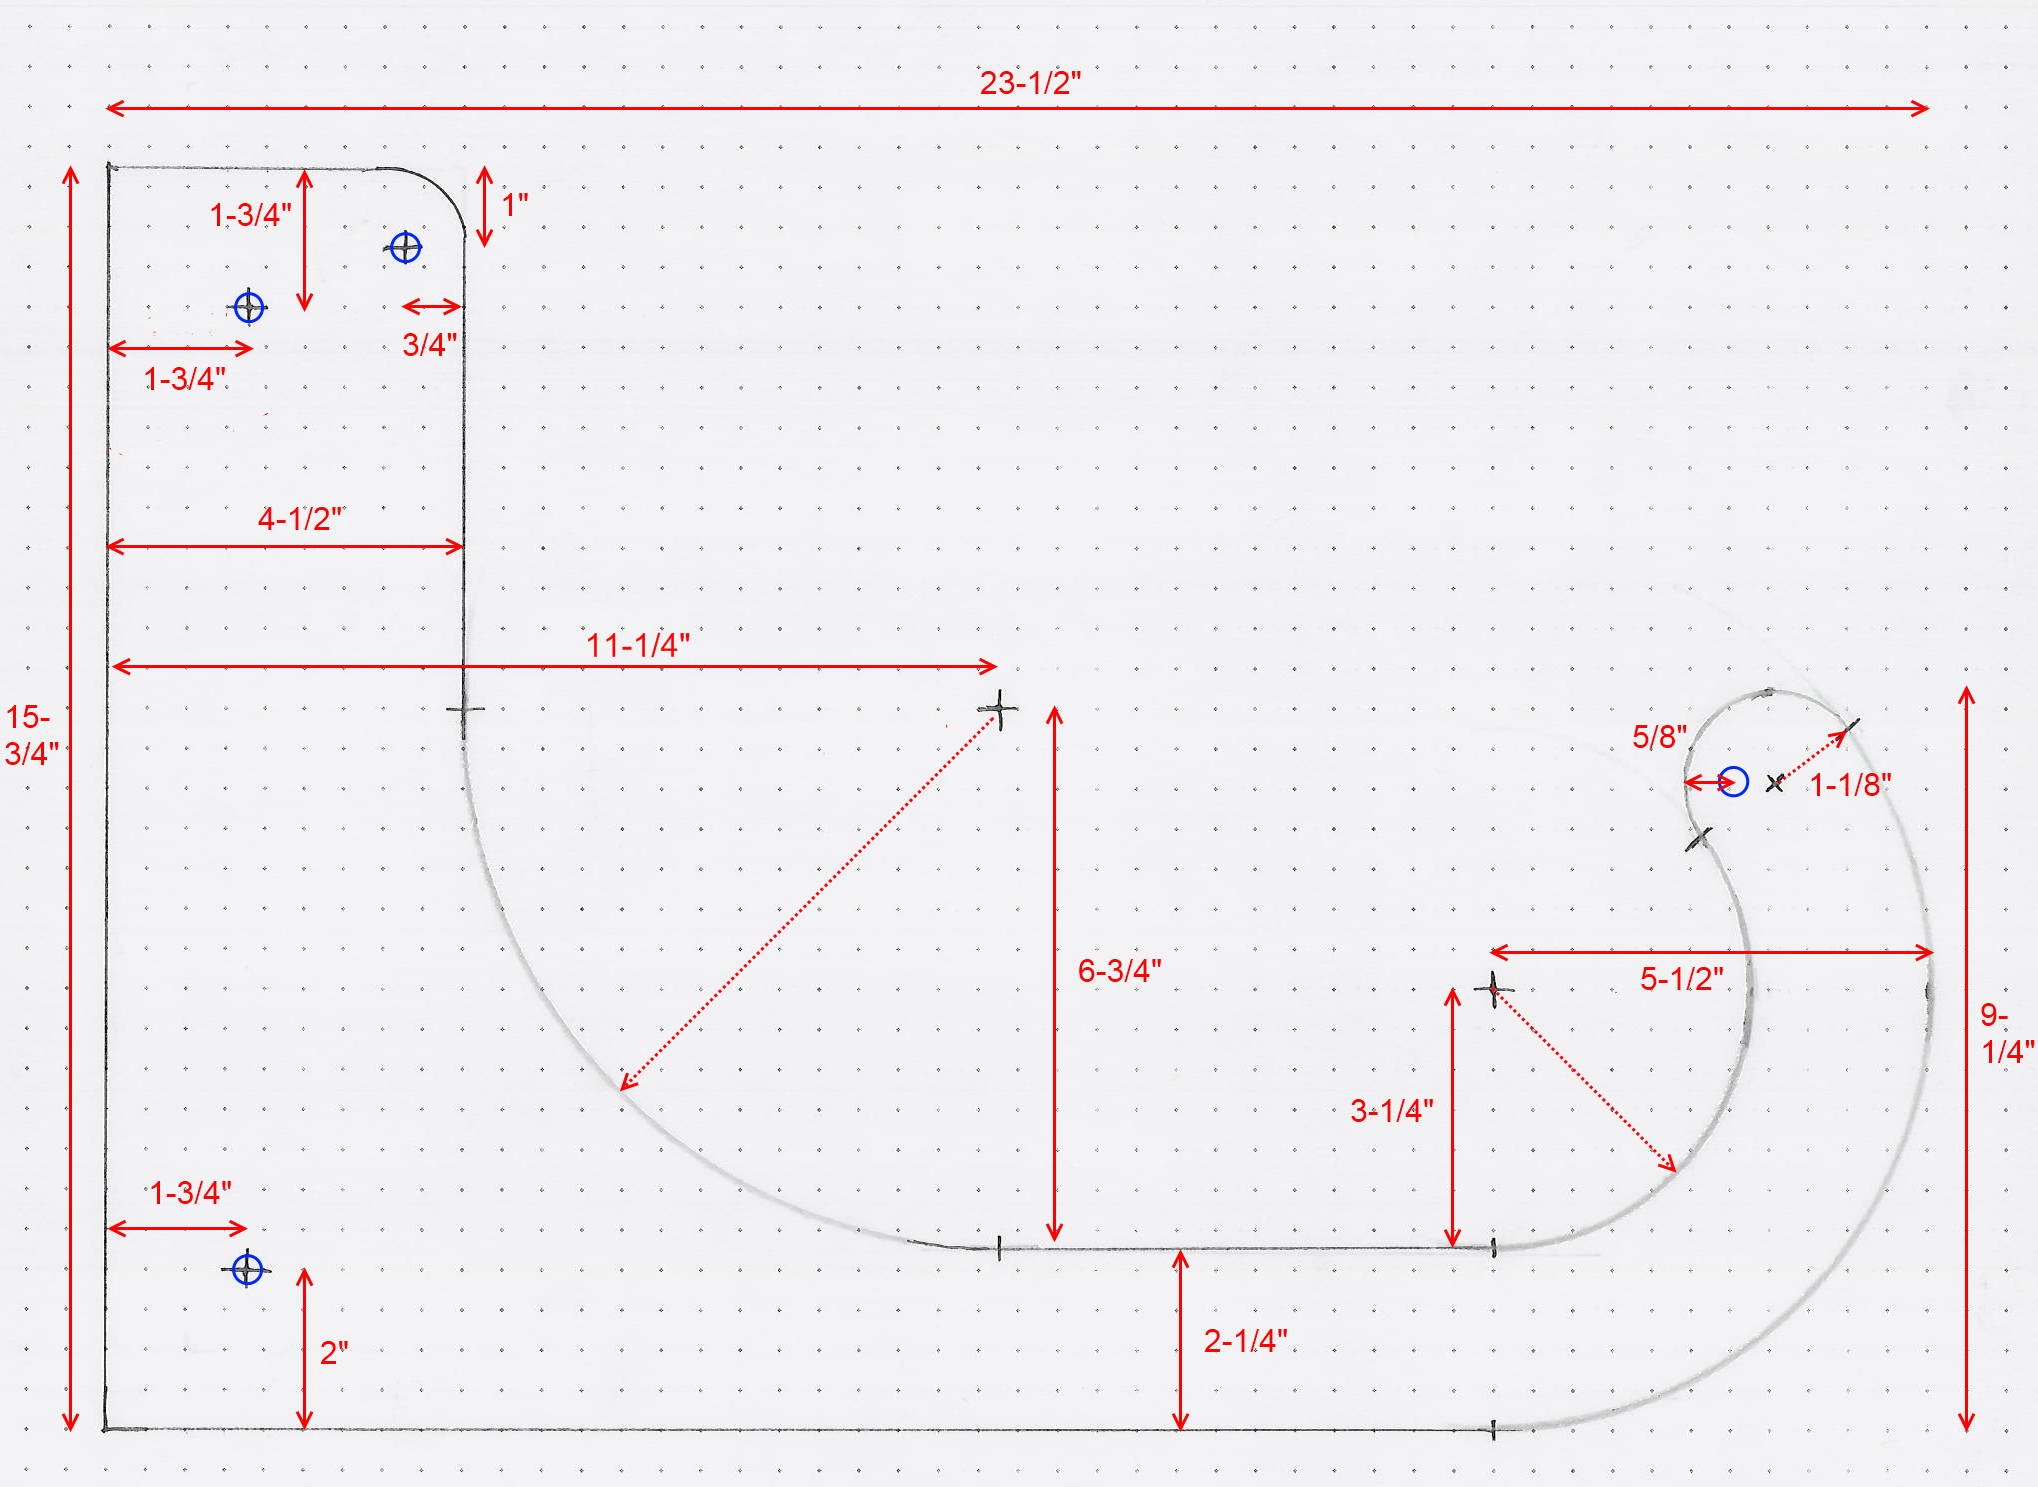
- Cut the bracket shape out of the panel according to the plans below. I used a router, but a jigsaw would work too. I used my router with a trimming bit to duplicate the subsequent bracket pieces.
- Drill the four holes in each bracket piece in the spots indicated by the blue circles. Use a 11/32†bit, which will fit the 5/16†bolts.
- Smooth the edges of each bracket piece with a sander or router.
- Cut the 1†dowel into 1-1/2†pieces, and drill a 11/32†hole down the center. You’ll need 2 per boat.
Cut the 1†PVC into 1-1/2†pieces. You’ll need 2 per boat. - For the nylon straps, you’ll going to need two lengths for each boat. I found 4-1/2 feet to be about right, which works well with the straps I found at Walmart. Cut if needed, and don’t forget to melt the ends and to have a buckle of some sort to attach the two ends together in a loop. My walmart straps had plenty of buckles included.
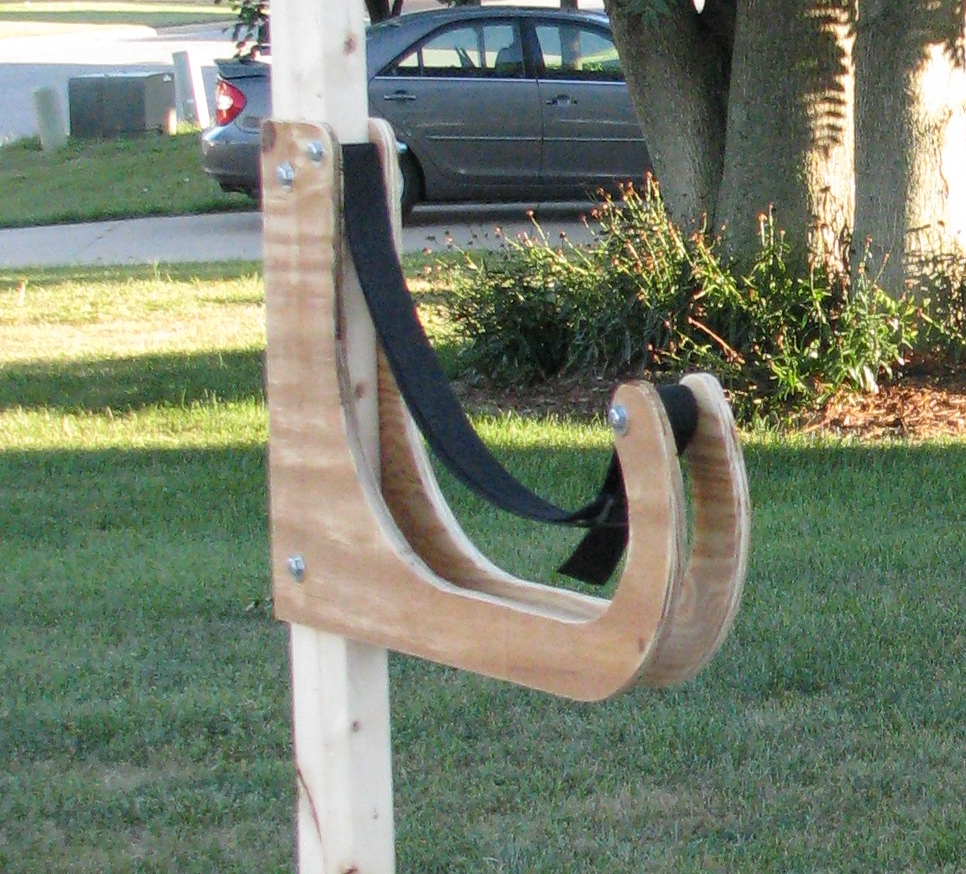
- Run a bolt through the outboard hole in one piece, through your “bushing†(consisting of the dowel piece and the PVC) and finally through a 2nd bracket piece.
- Run another bolt through the top hole, but you don’t need a bushing here.
- Loop the nylon strap between the two bolts.
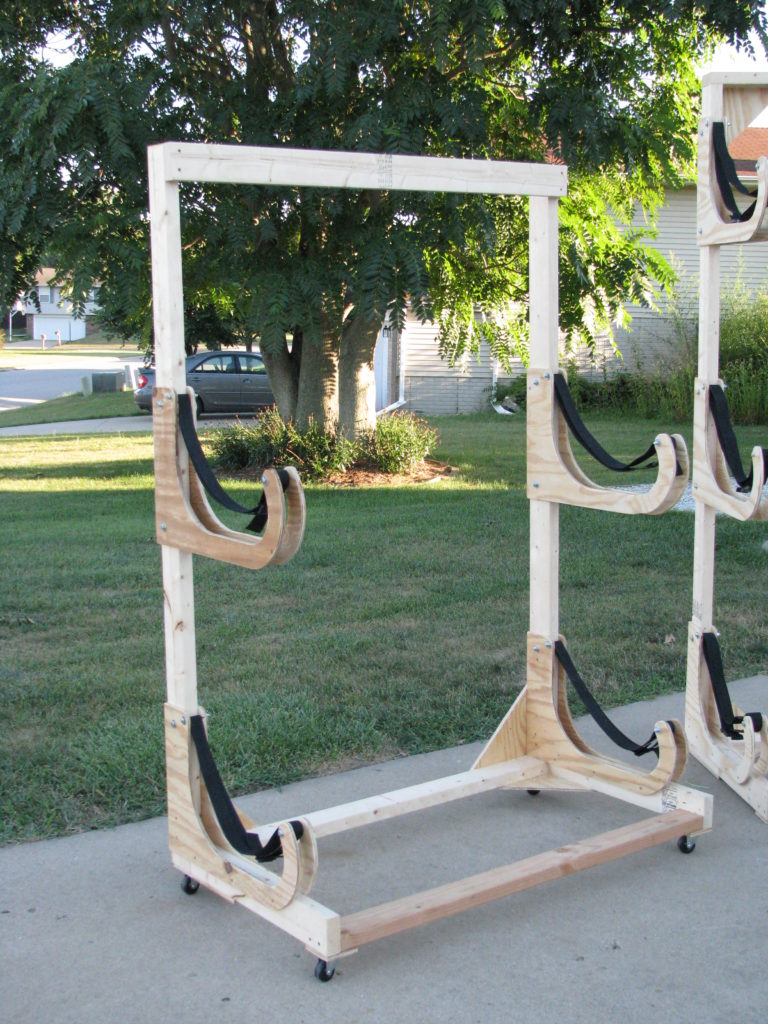
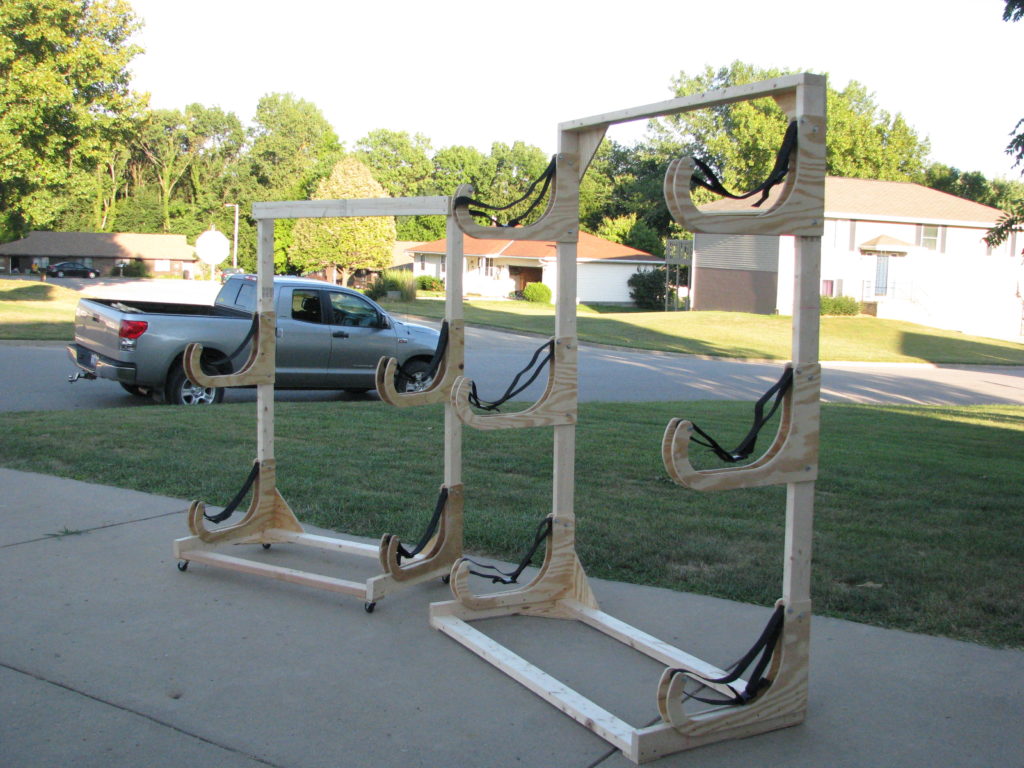
Once you’ve built your brackets, just build a simple 2×4 frame as shown by the photos. You should have plenty of scraps of plywood to cut the 12†triangle gussets for the corners. I used the bottom brackets as the structure which holds the legs in place. The upper shelf or shelves just bolt to the 2×4 uprights at the proper heights. I found that putting each shelf 32†(measured from top to top) apart worked well for my boats.
On my two boat rack, I put a board across the top where I’ll put some hooks to hang my life jackets, etc. I built a three boat rack, shown below, for a friend.
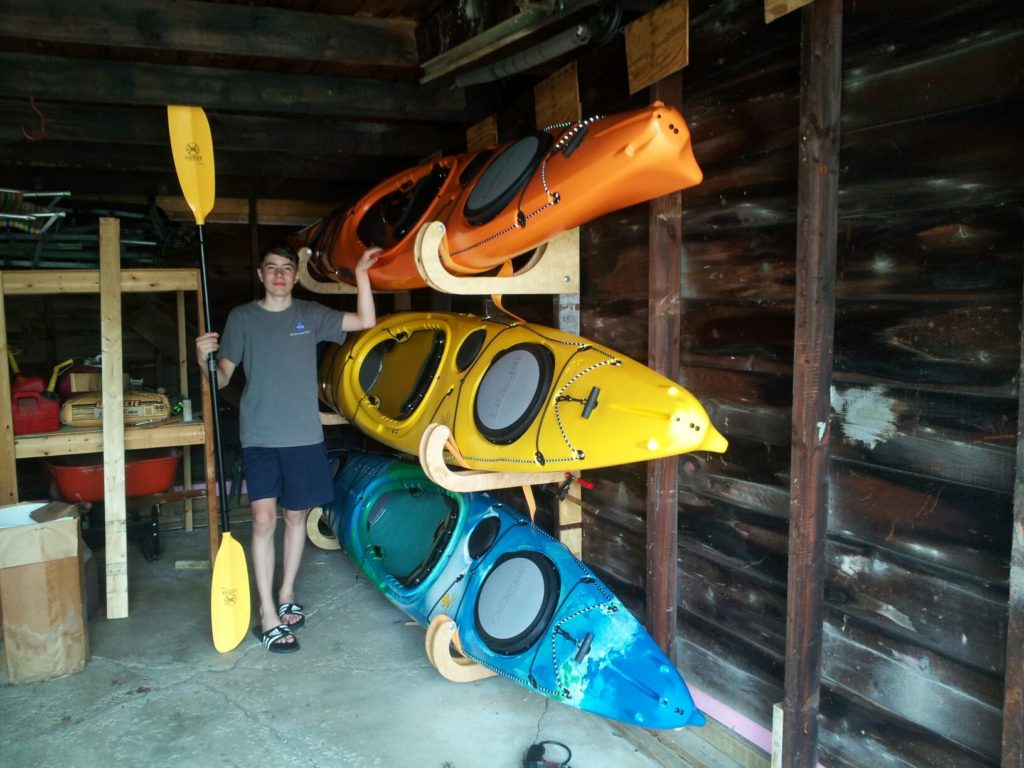
D. Ohmer sent in a picture of the rack he made using these plans. He mounted his straight to the studs in his garage – very nice!
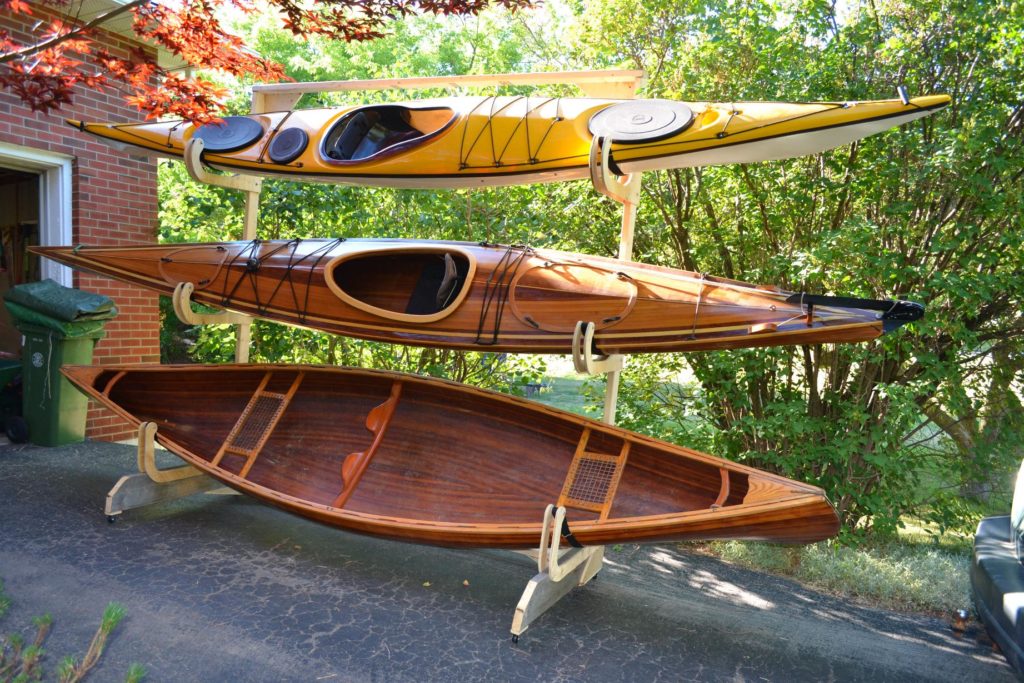
Terry Carleton sent in a picture of his beautiful boats and a modified version of this rack. Note the new dimensions in the comments.
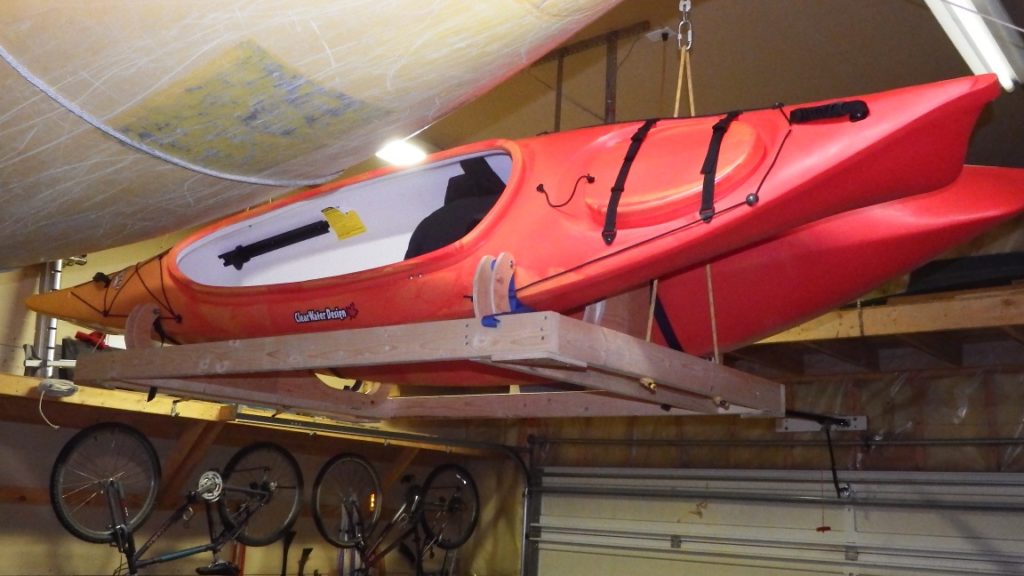
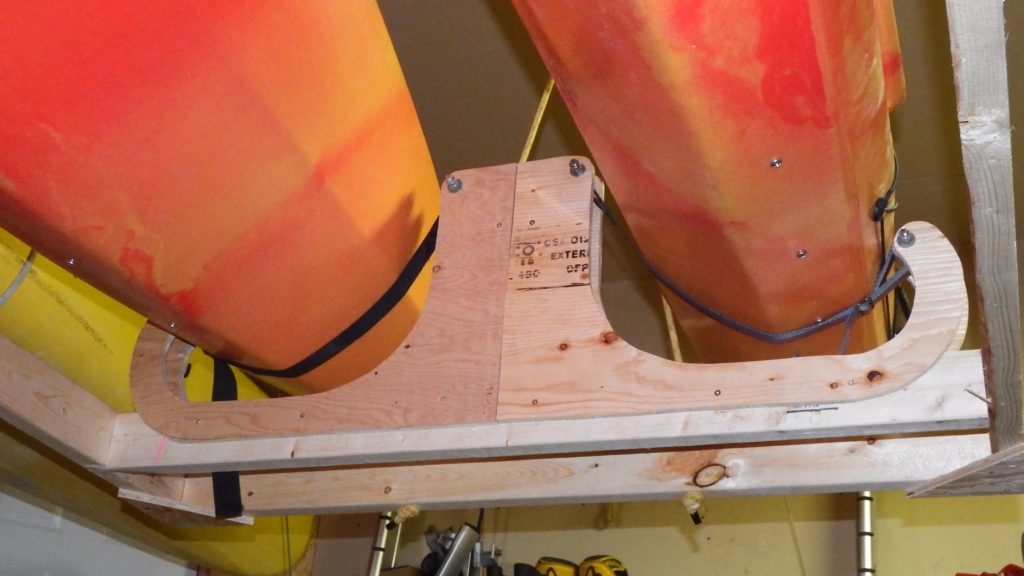
Louis Maisonneuve adapted this design to be hoisted up to the ceiling.
If these photos don’t answer your questions, feel free to drop me a note.


Thanks so much for placing your kayak rack plans on the web! I have built 3 sets of brackets to hold our boats on the wall of our garage. The only change I made to your plans was to use 2″ wide straps. Since this bumped out the width, I just cut some 3″ widestrips from the leftover scraps from the forms to shim out one side of each set. Also included the PVC/dowel units to the upper side of each bracket. Didn’t have to do it, but I had the material left over so why not. A coat of linseed oil to all the wooden parts and I’ll mount them when the kayaks we ordered arrive. Again… THANKS!
Great! Share pictures if you’d like!
Thanks very much for the idea and plan. I built a two kayak rack on large casters which makes it easy to haul in and out of the garage. I added a narrow panel along the top front to which I have fixed hooks on the back to hang the PFDs, and added a pair of short brackets above those for the kayaks to store the paddles. It works great. Thanks again for sharing your idea and insight.
Great idea, and I am going to build me one this weekend. My question is how long are the 2x4s you used for the height? Also how far out did the base stick out? Thanks for the information.
The important thing is the spacing between shelves. I went with 32 inches from top to top. That means for a three boat rack the uprights would be about 32+32+16=80 plus a few extra inches on top. Say 84″ total, assuming your boats are similar to mine and your garage is tall enough. My base sticks out about 3 inches past the support brackets. That’s not too important though.
If I had to do it over again, I’d make the total width small enough to fit in a pickup between the wheel wells.
Thanks so much for the plans – I’ve made two sets of brackets to hold my two touring kayaks in my nice new garage. I did add a 2″ bottom “plate” to the brackets, to hold them nice and securely in shape before I mounted them on the 2″ battens attached to the garage wall. A couple of coats of decking stain make them look very professional and give a tough finish.
Very good. That bottom plate is a good idea. I’ve been meaning to so something similar.
Thanks so very much for taking the time to post this. I am going to start building one for the two kayaks we have just purchased.
Any concerns about stability? e.g. tipping forward or backwards? we just bought 2 – 14′ kayaks at 53 lbs each. Love the idea of putting these on castors, to move easily about the garage. We will likely make it wider with 3 places for straps since our kayaks are 4′ longer, but want see if you’ve had any issues with it tipping forward or backwards. Many thanks for posting … great idea!
I haven’t had any problems tipping. The base is pretty spread out, and with only 2 boats, I wouldn’t be concerned.
I’m not positive I’d put a third support. That’s pretty atypical. Some friends of mine store their 13-14 footers with just two supports. I’d suggest maybe 6 feet between the supports for boats that size (with the 40-50% rule mentioned above). If you’ve got bulkheads, those are strong points, and probably a good choice for location for the supports.
Thanks Korey … yeah, we figured that adding the 3rd one was not going to work. We spaced them 5’6″ apart for a 14′ kayak … it works beautifully!!! Thanks again for the photos and instructions!
Korey – Excellent idea and job on the rack and the web page !
I did notice that the 11.75″ location dimension for the inner radius should actually be 11.25″ though … easily editable on your excellent pic 🙂
Thanks for putting this out there!
Ah, you’re correct. That dimension is wrong. Thanks. I’ll get it updated!
Kory, very nice design and thanks for sharing. Would be nice to have some storage racks designed in a similar fashion for outside that don’t allow rain to fall into the cockpit. Perhaps simply rotating the kayaks 180 degrees would be a simple solution. Your thoughts?
I’m not 100% positive that would keep all the water out, but it couldn’t hurt. They’re mostly on their side, but leaning slightly back. I’ve always heard that the danger with storing outside is UV from sunlight. I’ve heard of someone using this rack, attaching it to a fence, and building a frame to make a sunshade out of a tarp.
Korey,
I love the idea but I cannot find these nylon straps at Walmart with “plenty of buckles” included.
I looked online, and don’t see them anymore. If you don’t want to sew, how about making a loop around both attachment points, and join the bottom side with a water knot? http://www.animatedknots.com/waterknot/
JD, I found plenty of straps at Walmart, in the automotive section (towing straps) and the camping section (for carrying gear), but nothing that I liked. I wanted 2″ wide black and didn’t care about the buckles because I’m going to sew them once I determine the proper length. I ordered raw strap material from Amazon for $16.00 at
http://www.amazon.com/gp/product/B003K2BNR4/ref=oh_aui_detailpage_o00_s00?ie=UTF8&psc=1 .Thank you for putting your plans on the web. I am in the finishing stages of my own rack based on those plans. One change that seemed to work for me was to use styrofoam wrap normally used on 3/4″ water pipes placed over the edges of the brackets. The wrap is readily available at Home Depot and others. It was an easy fit as the wrap is already split and clings well to the brackets. The result is a soft bunk for the boat and spreads the weight of the support. I will add straps for additional safety.
Thanks again.
Ted
The pipe wrap is an interesting idea, and I use some on the upright supports in case the boat leans against them. For the benefit of the reader, though, I need to point out that the principal design features of these plans is supporting the boats exclusively with the straps. The straps will conform evenly to any shape, whereas any padding will still apply pressure unevenly based on the shape of the brackets. Padding should still work OK, but just not as well as the swing method.
Great rack. I saw a Malone rack and was going to copy it but make it out of wood. Then I came across your system! Had to build it! Thanks! Was exactly what we needed to store our boats. Sure makes life easier. Thanks again!
Awesome rack, thank you very much for posting this for us.
Just finished it last night and it works perfectly. I ordered seatbelt strapping from strapworks.com (although they sent me the wrong size) their straps are VERY inexpensive and you have your choice of colors too 😉
Very awesome rack design, this REALLY clears up the floor space in my garage during kayak season. I do have a pulley system for winter storage, so this rack is a very welcome addition.
Seat belts – good idea!
Thanks for the plans. I made this rack yesterday. I used 4x4s for the base (I had 2 30in pieces left over from a deck project). I made my racks 5’6″ wide to support my 2 ‘yaks (Wilderness Pungo 120). Used some rope for the straps until I can get to the store to buy some, but so far so good. The mrs likes it as the top rack makes is very easy for her to load/unload.
Greetings from okinawa! This rack plan is awesome. Built it in about four – five hours. Holds my two malibu minis well. Used 4 foot wide frame as well.
nice but is it important to put those 1 inches pvc
Great design!
I have the same question as gaston.
I was going to eliminate the bushing on the lower arm, but thought I’d ask before I found out the hard way, why it’s there.
The bushing makes it so that the strap cradle touches the boat, since the bolt is recessed a bit. If you don’t do something like that, the boat will rest against the plywood, and you’ll have a pressure point. Since I can’t put the bolt right at the edge of the plywood, the bushing method is what I used. You could also put a small wood block or something, just as long as the strap is outside the bracket on the boat side.
This is a great design. It’s similar to industrial or commercial racking applications called Cantilever Racking typically used for lumber or other long products.
Hey Korey,
Just built one of you racks yesterday. It’s the perfect design for my garage and kayaks (current design breeze 13 ft & wilderness systems pungo 14 ft).
I didn’t want a lot of boat hanging off each end so I made it 8 ft wide. Only webbing I could find was 1″, but it had the buckles on it and work fine.
Thanks again for posting your design. I’ll see about sending some pics.
Can you build me a three-tiered one and how much and how much would it cost to ship if you can Thank You looks like a great design!
Hello,
I am thrilled to find your kayak rack and plans.
I just cleared out my garage and had a new roof put on so it’s dry now!!
I have lots of lumber (2×4’s, large plywood scraps and insulation sheets) left from the roofing job that I hope to use to build a kayak rack. I’m on a tight budget and trying to build the rack myself (have never actually built anything myself, but ambitious and determined!
I currently own 2 Necky 14′ plastic kayaks (about 50 lbs each) and a 16′ fiberglass Impex, also around 50 lbs.
I like the idea of having the rack on rollers to move around.
Any design differences you’d suggest having 3 kayaks and one 16′ long?
Thanks kindly!
Stacy
Aim for your supports to be spaced according to the bulkheads, I figure. It’s not to hard to move the shelves up and down after installation though.
Very nice job guys.
If I can find a free place I’m going to try this for my kayaks in my garden. thanks for posting … great idea! more ideas i found here http://www.craigmarine.info/yacht_boat/builders/canoe_boat/Canoe-Storage.htm
This is a great design. How would you space the rack system for 2 kayaks that are different lengths? One is 10′, 44lbs. and other is 12′, 48 lbs.
Nice job! I’m going to build these brackets in the next few weeks, much more fun than just buying something to store my kayaks!
Building one now for my two 12 foot fishing kayaks. Thanks much for the design! I love the idea of a movable rack unit. I can change the location of the entire setup for winter and summer storage.
I’ll run plywood below the base frame to make a storage box for my fishing gear. Then hooks on the top above the kayaks for paddles. I’m also adding 1/2 shims where the hooks attach to make room for two inch straps.
Happy New Year!
G’day Korey,
What a great design it’s fantastic what you come up with. I’ve been scratching my head trying to work out exactly how I was going to store my kayak. You have solve my problem. I really appreciate you making the plans available and I’m looking forward to building the rack. It’s going to be really nice project thanks once again.
Cheers Peter
Australia
Many thanks for the storage rack design. I built a “triple-decker” for my stripper canoe (15.5 ft) and two full-size sea kayaks (a home-made stripper is 17ft and 24″ beam, a Valley Avocet is 16ft 2″ and 22″ beam). The main differences from the kayak brackets of Korey Atterberry, to accommodate the canoe which has a 3ft beam at centre, are:
1) Increase in the length of the base of the bracket to 31″.
2) Increase in the vertical support side of the bracket to 23.5″
3) Increase in the vertical tongue of the bracket to 12″.
All other bracket dimensions remain the same.
Because we go in for real, full-length sea kayaks, instead of plastic toys, here in the frozen north (it was 90 deg F yesterday!), the frame is doubled in length from 4 ft to 8ft. Also, because of the wider beam on the canoe, the lowest brackets are attached to 2×8″ feet, rather than 2×4″. This prevents the gunwhale of the canoe from hitting the ground. Despite the larger size of the canoe brackets, I was able to use only one 4x8ft plywood sheet and still have enough left over for the corner gussets, which maintained a good stiff frame, even with the doubling in length.
Again many thanks for a great design which has saved me a lot of garage space and looks aesthetically pleasing, at a cost of only about CAN$70.00.
(picture available)
Hi! Just so this post! Great idea!
Going to ,make 4 of these for my 2 Kayaks and mount them to our fence in the backyard. next to the canal.
Q. It may sound silly but what is the purpose of the straps? I don’t see in any of the picc that the kayaks are strapped down. Do the kayaks sit on top of the straps or are they for securing the kayaks?
The straps aren’t to hold the boats on. They are to provide a nice smooth and even surface without pressure points. If you set a boat on something hard, it might dent over time. Good luck!
I love this rack and want to store 2 14′ kayaks. What would you recommend the spacing be and can I have them be completely upside down?
We’re sure glad we found your kayak storage design. Thanks so much for posting that. Our issue was limited space on the floor of our garage. However, we happen to have a 15′ ceiling so we adjusted your plans and went topwise. Your brackets worked out just fine for our 2 boats after some mods to the frame. Although the final weight of the finished frame was more than we anticipated, (50 lbs), it was still a relatively painless process to get everything up high and out of the way. If you’re at all interested, we can send pix of our project hanging up there…
can someone explain me the bushing wére doing with the pvs and dowel. I don’t understand
The dowel and bushing push the strap out past the wooden bracket. That way, the boat doesn’t rub on the bracket and is cradled by the strap. If the bolt could have be placed at the very edge of the bracket, the dowel, PVC, etc. wouldn’t be necessary.
Is it easy
can you tell me how you came up with the general dimensions, not the working plan details you have clearly drawn?
i mean, the particular contour, and the exact length depthwise of your brackets allow for your boats to lay just right.
but i have necki kayaks that are somewhat bigger i think, than yours shown.
maybe i just need to imagine a cross-section at the bulkhead points so as to get my specific ‘depth’ and height of bracket.
does this make sense?
thanks for any tips (i perhaps overlooked some place you’ve already answered my question).
michael
There wasn’t any detailed process for that. I either just tried something or perhaps I considered the rough dimensions of the commercial products available.
Mine is built for sit-in recreational kayaks, so unless you have a sit on top, your boat is probably not as wide. I think the green one is 30″ wide.
The other thing to keep in mind, even if your boat is bigger, it can just sit at a different angle. More on its side, less on its belly.
Great plan Korey! I’m a little new to woodworking, but have built the support racks already. I’m a little confused about the “bushing” parts. Do the dowel and PVC go next to each other? How do those work? It is my understanding that the top bolt where the nylon strap loops around does not have bushing. Therefore the dowel and PVC must go on the bottom bolt where the nylon straps also loops. Sorry for what I’m sure is a simple question. Thank you again for this great plan. We have two kayaks, 16′ and 14.5′. Looking forward to finishing this project!